tSimCNE — visualization for image datasets
This is the documentation for t-SimCNE, a visualization tool for image datasets. This page is supposed to give a small overview of how the method works and how you can make use of the available code to visualize your own image datasets.
If you use this project, we would appreciate if you cite the following ICLR 2023 paper:
@inproceedings{boehm2023unsupervised,
  title={Unsupervised visualization of image datasets using contrastive learning},
  author={B{\"o}hm, Jan Niklas and Berens, Philipp and Kobak, Dmitry},
  booktitle={International Conference on Learning Representations},
  year={2023},
}
Here is an example visualization of the well-known CIFAR-10 dataset, just to give you an idea of how the result can look like:
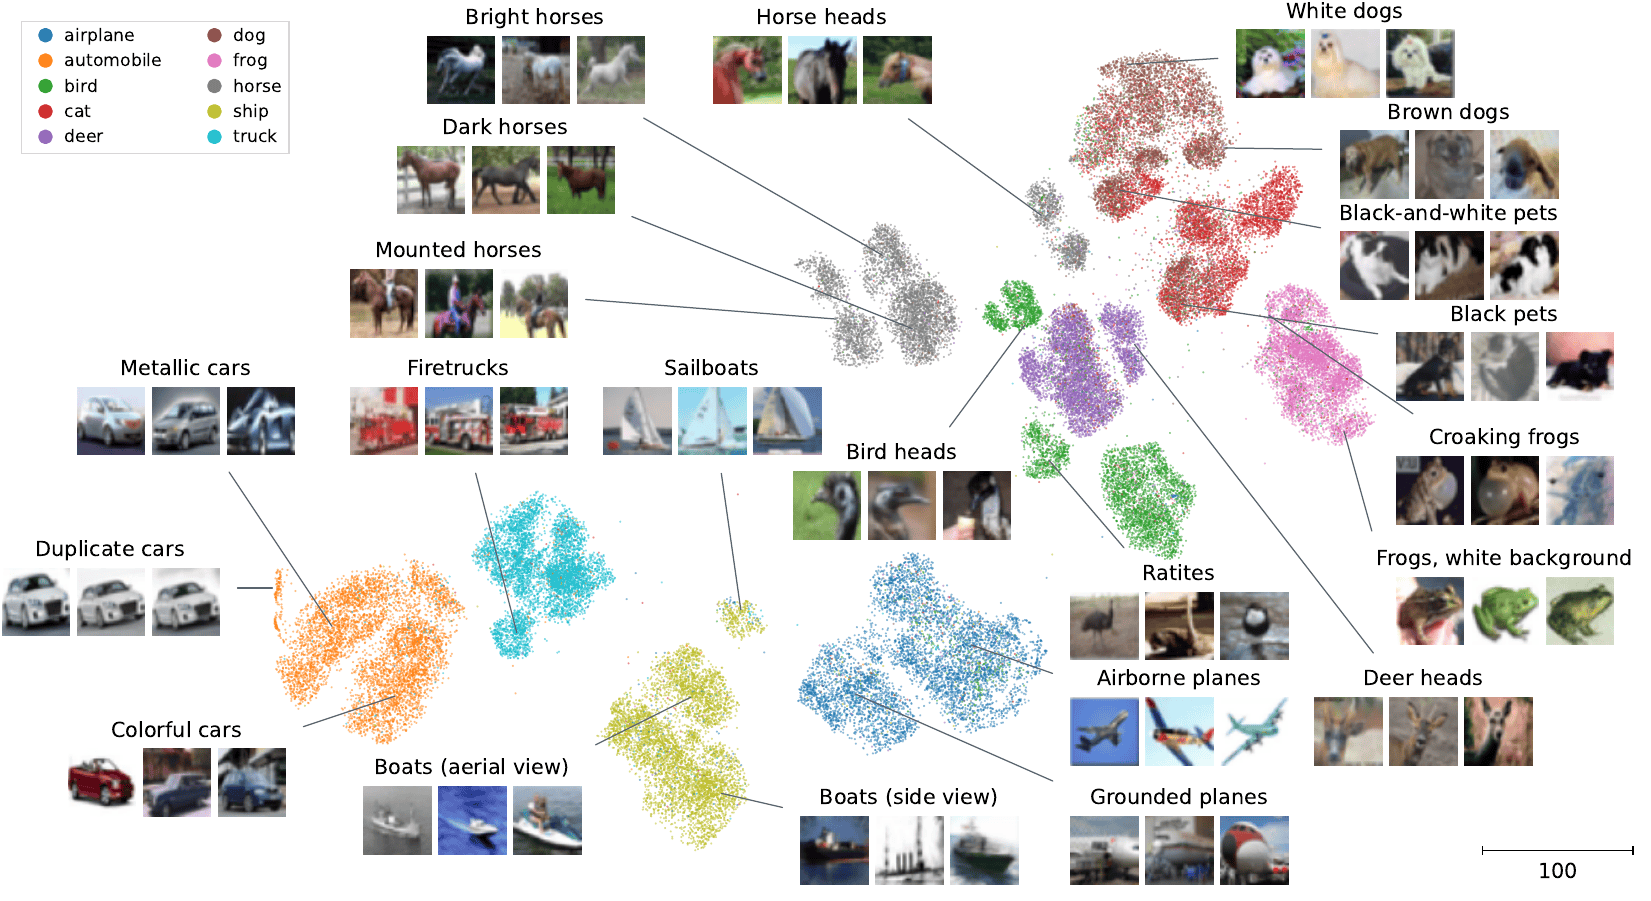
An annotated 2D visualization produced by tSimCNE of the CIFAR-10 dataset, showing subcluster structure.
Installation
The package should be installable via pip with
pip install tsimcne
The package is on PyPI.
Usage example
import torch
import torchvision
from matplotlib import pyplot as plt
from tsimcne.tsimcne import TSimCNE

# get the cifar dataset (make sure to adapt `data_root` to point to your folder)
data_root = "experiments/cifar/out/cifar10"
dataset_train = torchvision.datasets.CIFAR10(
    root=data_root,
    download=True,
    train=True,
)
dataset_test = torchvision.datasets.CIFAR10(
    root=data_root,
    download=True,
    train=False,
)
dataset_full = torch.utils.data.ConcatDataset([dataset_train, dataset_test])

# create the object (here we run t-SimCNE with fewer epochs
# than in the paper; there we used [1000, 50, 450]).
tsimcne = TSimCNE(total_epochs=[500, 50, 250])

# train on the augmented/contrastive dataloader (this takes the most time)
tsimcne.fit(dataset_full)

# map the original images to 2D
Y = tsimcne.transform(dataset_full)

# get the original labels from the dataset
labels = [lbl for img, lbl in dataset_full]

# plot the data
fig, ax = plt.subplots()
ax.scatter(*Y.T, c=labels)
fig.savefig("tsimcne.png")
The above code first creates the CIFAR dataset, then creates the
t-SimCNE object, which is then fitted. Afterwards we can call
tsimcne.transform(X) to get the 2D representation of the image
dataset, which can be used for further analysis, such as
visualization.
How does it work?
The method leverages contrastive learning in order to align two views of the same image in 2D. This means that the network learns to place similar images close together in the output space. For this it leverages a new kernel, the Cauchy kernel, to calculate the similarity, which is used in t-SNE.

As the method draws inspiration from both SimCLR (Chen et al., ICML 2020) as well as t-SNE (van der Maaten & Hinton, JMLR 2008), the resulting method is an amalgamation of the two names, termed tSimCNE (with or without a dash).
API
- class tsimcne.TSimCNE(model=None, loss='infonce', metric=None, backbone='resnet18_simclr', projection_head='mlp', data_transform=None, total_epochs=[1000, 50, 450], batch_size=512, out_dim=2, pretrain_out_dim=128, optimizer='sgd', lr_scheduler='cos_annealing', lr='auto_batch', warmup='auto', freeze_schedule='only_linear', image_size=None, devices=1, trainer_kwargs=None, num_workers=8, dl_kwargs=None, use_ffcv='auto', float32_matmul_precision='medium')
The main entry point for fitting tSimCNE on a dataset.
This class implements the algorithm described in Böhm et al. (ICLR 2023). It learns a model that will map image data points to 2D, allowing an entire dataset to be visualized at once in the form of each datum represented as a dot in the Cartesian plane.
See also Parameter guide for a detailed explanation with examples of a selection of the parameters.
- Parameters:
model (None) – The model to train. By default it will be constructed from the two parameters backbone and projection_head.
loss ("infonce") – The (contrastive) loss to use. Default is
"infonce"and currently the only supported one. For alternatives, see Damrich et al. (ICLR 2023).metric (None) – The metric that is used to calculate the similarity. Defaults to Euclidean metric (with the Cauchy kernel). Another option is
"cosine"to get the default SimCLR loss.backbone ("resnet18_simclr") – Backbone to use for the contrastive model. Defaults to ResNet18 as defined in the original SimCLR paper (so with a smaller kernel size). Other options are
"resnet50", etc. or simply pass in a torch model directly.projection_head ("mlp") –
The projection head that maps from the backbone features down to the
"out_dim". Also accepts a torch model.The activation function is a ReLU. By default a multilayer perceptron with one hidden layer going from 512 (output dim. of ResNet18) → 1024 → 128. The last layer is the output dimension during the first training stage, afterwards the model will be mutated in-place to then map 512 → 1024 → 2.
Note that if the output dimension of the backbone was changed, then this needs to be appropriately reflected in the projection head as well.
- :param None |
"is_included"| torchvision.transforms | ffcv.transforms data_transform: The data augmentations to create the differing views of the input. By default it will use the same augmentations as written in Böhm et al. (2023); random cropping, greyscaling, color jitter, horizontal flips. This parameter should be changed with care.
If
data_transform="is_included", then it is assumed that all of the data augmentations are already included within the dataset objectX(which is passed to tsimcne.fit) and will return the augmented samples along with a (dummy) label.
- Parameters:
total_epochs ([1000, 50, 450]) – A list of the number of epochs per training stage. The ratio between the stages should be roughly preserved and it should also be exactly three. You can also pass a single integer, which will then only fit the first stage.
batch_size (512) – The number of images in one batch. Note that this parameter should be set as high as the memory of the GPU allows, as contrastive learning benefits from larger batch sizes. For each image in the batch two views will be generated, so by default the batch size will be
2 * 512 = 1024.out_dim (2) – The number of output dimensions. For the purpose of viusalization you should leave this as 2 (the default). But tSimCNE can also map into an arbitrary number of dimensions (so it could also be used to plot a dataset in 3D, for example).
pretrain_out_dim (128) – The number of output dimensions during pretraining (the first stage).
optimizer ("sgd") – The optimizer to use. Currently only
"sgd"is allowed.lr_scheduler ("cos_annealing") – The learning rate scheduler to use. Currently only
"cos_annealing"is allowed.lr ("auto_batch") – The learning rate to use. By default it uses a learning rate adapted to the batch size (as well as the training stage).
warmup ("auto") – The number of warmup epochs. By default it will do 10 epochs of warmup (linearly interpolating from 0 to the initial learning rate) if the number of epochs is at least 100, otherwise it will be 0 warmup epochs.
freeze_schedule ("only_linear") – The behavior for freezing/unfreezing the network during the different optimization stages. Only change this, if you know what will happen to the model. For now, only the default is allowed.
image_size (tuple) – The size of the images in the dataset. If not passed will be attempted to be inferred from the dataset. Required if
use_ffcv=True(as the dataset will need to point to the beton file string and the size information cannot be inferred from that).devices (1) –
The number of devices/accelerators to use (with the PL Trainer). Will be passed on as is. Consider this parameter experimental, the effects of using multiple GPUs is not entirely clear (but it should probably be safe to do so).
Currently, the learning rate is not adjusted to account for multiple devices, please do so yourself; see the PL documentation about it.
trainer_kwargs (dict | None) – The keyword arguments to pass to the Trainer, to use during training. By default the keys
gradient_clip_val=4andgradient_clip_algorithm="value"will be set, but can be overridden by passing in a custom dict. The values will be set regardless of whether you pass in adictor not, so if you want to disable gradient clipping you need to override the values.num_workers (int=8) – The number of workers for creating the dataloader. Will be passed to the pytorch DataLoader constructor.
dl_kwargs (dict) – Additional keyword arguments that will be passed on to the pytorch dataloader constructor.
use_ffcv (bool | "auto") – Whether to use the ffcv-ssl library to load the data from disk. If set to
"auto"(default) it will check if the supplied argument is a filepath (to a .beton file) and set it toTrue, otherwise it will beFalse.float32_matmul_precision (str="medium") – The precision to set for
torch.set_float32_matmul_precision. By default it will be set to"medium". Set toFalseto leave the default. (This is mostly as a convenience to silence the warning that will otherwise be shown if the value is unset.)
- fit(X: Dataset | str | Path)
Learn the mapping from the dataset
Xto 2D.- Parameters:
X – The image dataset to be used for training. Will be wrapped into a data loader automatically. If
use_ffcv=True, then it needs to be a string pointing to the .beton file.
- fit_transform(X: Dataset | str, data_transform=None, return_labels: bool = False, return_backbone_feat: bool = False)
Learn the mapping from the dataset to 2D and return it.
- Parameters:
X – The image dataset to be used for training. Will be wrapped into a data loader automatically. If
use_ffcv=True, then it needs to be a string pointing to the .beton file.data_transform – the data transformation to use for calculating the final 2D embedding. By default it will not perform any data augmentation (as this is only relevant during training).
return_labels (False) – Whether to return the labels that are part of the dataset.
return_backbone_feat (False) – Whether to return the high-dimensional features of the backbone.
Contents
API Reference